


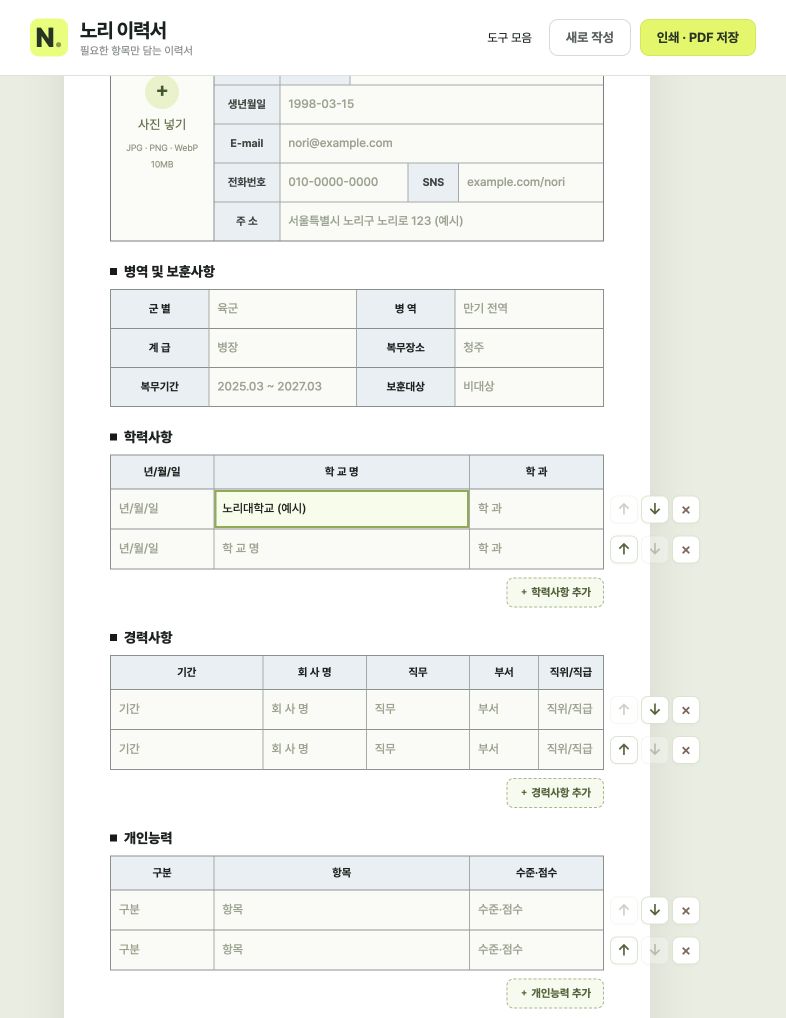
Nori Resume lets you type directly into a web-based resume form without installing an editor or fixing broken tables. Start free without an account, then save a PDF through the browser print dialog.
What to prepare
- Your name, contact details, email and any information required by the recipient
- School and company names, study and employment dates, and responsibilities
- If a photo is required: a JPG, PNG or WebP up to 10 MB
A wider desktop screen makes long entries and full-table editing easier. On mobile, use Fit to screen and Large view above the document to switch between overview and enlarged input.
On mobile, switch between overview and enlarged editing
- Fit to screen is selected initially, showing the document’s full width at a smaller scale. Scroll down to see the rest.
- If text is too small to edit, choose Large view. Move horizontally within the enlarged document to reach each field.
- After editing, return to Fit to screen to check the full layout. Switching views does not change your entries.
These mobile controls are available in Korean, English, Japanese and Simplified Chinese. Their scale affects only the editor view, not PDF paper size or print scale.
1. Choose the sections you need
In Visible sections, choose military/veteran details, education, experience and skills. Disabled sections are hidden in both the editor and printout. First choose separate education/experience tables or a combined table.
When changing layouts, choose Switch view only or Copy content and switch. The first keeps each layout’s existing entries; the second copies the current table and replaces the destination table’s entries. The original table remains, so Switch view only can return to it.
The combined table joins duties, department and position in one cell. When splitting again, classify each row as education or experience. Unchanged imported experience can return to its original fields; manually entered or edited text goes into duties. Save a draft before switching important entries. Printing uses the currently selected layout.
Optional information lets you choose birth date or Korean resident registration number, and whether to show social links. Check the recipient’s requirements and enter only what is needed.
2. Type directly in the resume
Click blank fields for your name, contact details, education and experience. Pale gray names such as Kim Nori are placeholders, not saved entries. Unfilled placeholders are not printed.
Click Add photo and choose a JPG, PNG or WebP up to 10 MB. Click the image again to replace it, or Remove photo to delete it. The adjustment dialog opens after selection. Fit whole photo preserves proportions and leaves margins if needed. Fill frame preserves proportions but may crop the edges. Selecting either mode resets its default scale and centers the image.
Zoom from 10–300% relative to the selected fit mode. Drag the photo or use the horizontal and vertical sliders, then choose Apply photo. Reset position restores the starting position; Cancel keeps the previous photo. You can reopen Adjust photo position and size above the document. The adjusted portrait image keeps its proportions inside the frame.
3. Put education and experience in order
Add rows with + Add education or + Add experience below the table. Use ↑ and ↓ beside each row to move it one place. The combined table and skills table support the same controls.
The × button deletes a row. A confirmation appears if the row contains entries; the last remaining row cannot be deleted. Up is disabled on the first row and Down on the last. These editing controls are not printed.
This is not automatic date sorting. If you choose newest-first order, move each row manually using the same rule throughout.
4. Save an A4 PDF
- Choose Print · Save PDF at the top.
- Choose Save as PDF as the destination in the browser print dialog. The name may differ by device.
- Where available, choose A4 paper, 100% scale, and turn off headers and footers.
- Check the print preview for clipped text or blank pages before saving.
Print and PDF menus vary by device and browser. If unavailable, use a desktop browser. To continue on a PC, save a draft, transfer that file, then choose Load draft in Nori Resume on the PC. There is no automatic device sync.
Check before submitting
Check contact details, email spelling, date order and photo orientation. Review long entries in the print preview. A small Nori Tools free-creation note appears at the bottom of the printout.
Save a draft and continue later
- Under Continue editing, choose Save draft to download a Nori Resume .json file.
- The file includes entered details, the original photo, photo adjustments, table entries and order, and visible sections.
- Later, choose Load draft on the resume page and select the saved file. Confirm replacement of the current entries before importing.
- After editing, save a new draft file again. Previously downloaded files are not updated automatically.
Only Nori Resume draft files up to 32 MB can be imported. Invalid files show a message without changing your entries. Drafts are for editing; PDFs are for submission and printing. PDFs and resumes from other programs cannot be imported as drafts.
Are my entries saved automatically?
There is no autosave. Before closing, save a draft for continued editing and a PDF for submission. Drafts are downloaded to your device, not sent to a server. They include personal details and photos, so store them securely and check downloaded files on shared devices.